As an Amazon Associate I earn from qualifying purchases and sometimes recommend products from other sellers at no extra cost to you. For more details see my disclosure policy and privacy policy.
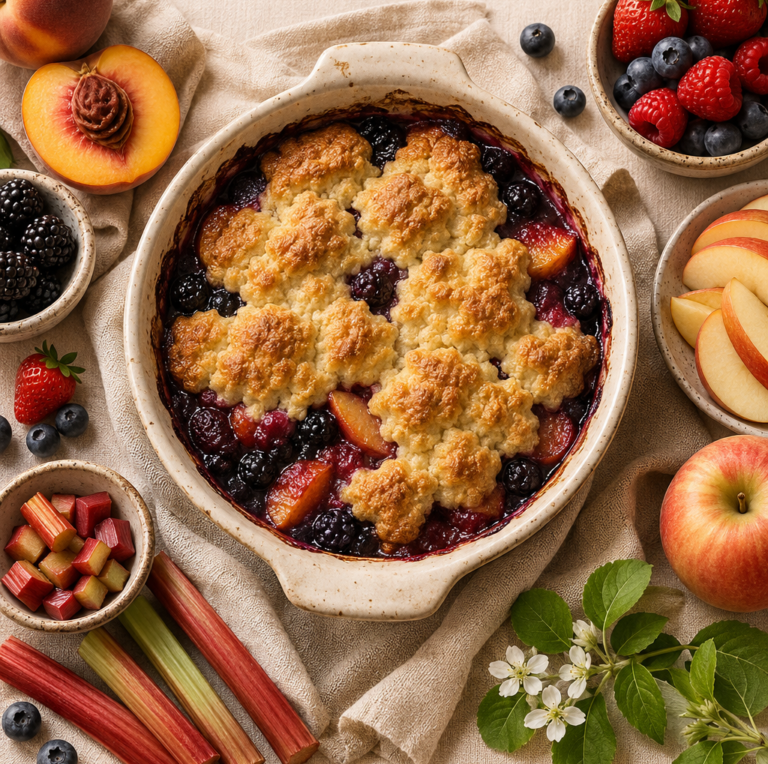
There’s something deeply satisfying about pulling a cobbler out of the oven — the fruit bubbling at the edges, the topping golden and fragrant, the whole kitchen smelling like a hug. But if you’ve ever wondered why your cobbler topping came out gummy, too thick, or nothing like the one in the photo, the answer almost always comes down to which style you’re making. Not all cobbler toppings are the same, and knowing the difference is what takes your bake from “pretty good” to “send me the recipe.”
In this guide, we’re breaking down the three main cobbler topping styles — biscuit, cake, and crumb — so you can choose the right one for any fruit filling, any season, and any occasion. Whether you’re a beginner working through the basics or a more experienced baker looking to nail the technique, you’ll come away with a solid understanding of how each topping works and when to reach for it.
What Makes a Great Cobbler Topping?
Before we get into the three styles, it helps to understand what you’re actually trying to achieve. A cobbler isn’t a pie — there’s no rolled-out pastry here. The topping is meant to sit on top of a fruit filling and bake into something that contrasts beautifully with the soft, jammy fruit underneath.
The ideal cobbler topping bakes up golden on top, cooks through without a gummy or raw centre, and holds its shape when you serve it. It should be distinct from the filling — textured and a little crisp on top, tender underneath — rather than blending into it. Achieving that balance is what each of the three methods does in its own way.
One principle applies across all three styles: use a wide, shallow dish rather than a deep one. This gives the topping more surface area to brown and helps it cook through evenly. A 9×13-inch baking dish or a similar wide ceramic dish works well for most cobbler recipes.
The Three Cobbler Topping Styles at a Glance
Each topping style has its own texture, technique, and personality. Here’s a quick overview before we go deeper into each one:
- Biscuit topping — rustic, dropped-dough mounds that puff up golden and crisp on top, tender and a little caramelised where they meet the fruit. The most classic style.
- Cake topping — a pourable batter that bakes into a soft, even layer. Lighter in texture, easier to make, and great for a more uniform look.
- Crumb topping — a sandy, buttery mixture rubbed together and scattered over the fruit, similar to a crumble or streusel. The crispiest of the three and the most forgiving to make.
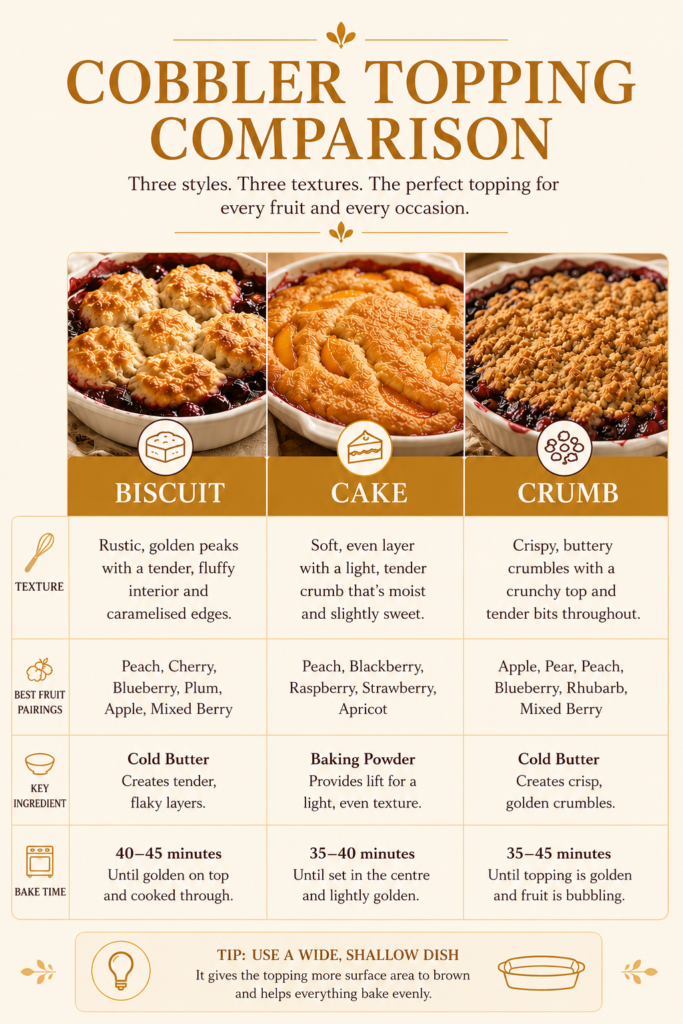
Understanding what sets each one apart makes it much easier to choose the right topping for your fruit, your occasion, and your own taste preferences.
Biscuit Topping: Classic and Rustic
The biscuit-style cobbler topping is the one most people picture when they think of a traditional cobbler. It’s made from a simple dough — flour, sugar, baking powder, butter, and a liquid like milk or buttermilk — then dropped in rough mounds over the fruit filling before baking. The result is a rustic, patchy topping that puffs up and browns beautifully, with golden domed tops and fruit-soaked edges.
This style sits somewhere between a scone and a drop dumpling in texture, which is why it feels more substantial than a crumble or crisp. The edges that come into contact with the bubbling fruit get a little caramelised and tender, while the tops stay golden and slightly crisp. It’s deeply flavourful and exactly the kind of cobbler that looks impressive with almost no effort at all.
The Key to Getting It Right
The most common mistake with a biscuit topping is overmixing the dough. Like scones, this topping relies on cold fat to create a tender, flaky crumb. Work cold butter into the flour with your fingertips or a pastry cutter until the mixture looks like rough, uneven crumbs with some larger butter pieces still visible — those butter pockets are what create layers and tenderness as the topping bakes. Add your liquid gradually and stop stirring as soon as the dough just comes together. A few streaks of flour are fine.
The other thing to avoid is smoothing the topping flat. Drop rough spoonfuls over the fruit and leave gaps between them — this is normal and intentional. The uneven surface creates those satisfying crispy peaks, and the gaps allow steam to escape so the topping cooks through rather than steaming itself soggy.
What Goes Into a Biscuit Cobbler Topping
A basic biscuit topping needs just a handful of ingredients: plain flour, a small amount of sugar, baking powder, salt, cold butter, and milk or buttermilk. Buttermilk is worth using if you have it — the slight tang works especially well with stone fruits like peach or cherry, and it produces a more tender crumb than plain milk. If you don’t have buttermilk, stir a tablespoon of lemon juice into regular milk and let it sit for five minutes. There are plenty of other baking substitutions that work well here too, including plant-based milks and vegan butter in equal quantities.
Make sure your baking powder is fresh before you start — it’s the leavening that makes the topping puff and rise, and old or inactive baking powder produces a flat, dense result. To test it, drop a teaspoon into a cup of hot water. If it fizzes vigorously, it’s good to go.
Flavour Variations Worth Trying
The base recipe is deliberately neutral so it works with any fruit, but it takes well to simple additions. Stir a teaspoon of cinnamon or a pinch of nutmeg into the dry ingredients for a warm-spiced topping that suits apple, pear, or plum particularly well. Swapping the white sugar for light brown sugar adds a subtle caramel depth that works with almost any filling. A little lemon zest in the dough lifts berry cobblers beautifully.
When to Use a Biscuit Topping
This style is the most traditional choice and works with virtually any fruit filling. It shines with peach, cherry, mixed berry, and plum cobblers. Because it’s the most substantial of the three toppings, it also holds up well to very juicy fillings — the dough absorbs some of the fruit juices without going soggy.
Cake Topping: Soft and Spoonable
The cake-style cobbler topping is made from a batter rather than a dough — think of it as a simple vanilla cake batter poured or spooned over your fruit. It bakes up softer and more uniform than the biscuit style, with a tender, cakey crumb that absorbs fruit juices from below while developing a golden top.
This is a great choice if you prefer a lighter, more even topping without the rustic dropped look of a biscuit cobbler. It’s also the easiest of the three to make, because there’s no cold butter technique involved — you’re simply whisking a batter together.
How the Cake Topping Bakes
What makes the cake-style topping interesting is that it can be baked in two different ways. In the more traditional approach, the batter is poured into the buttered dish first and the fruit is spooned on top — as it bakes, the fruit sinks while the batter rises up and around it, creating a soft, almost pudding-like cobbler with a crust that forms around the edges. This is especially popular in Southern American-style baking.
Alternatively, you can spoon the batter directly over the fruit in the dish, which gives you a slightly crisper top and a more conventional cobbler appearance. Both methods work — it just depends on the texture you prefer. The pour-under method gives a saucier, more custardy result; the pour-over method gives something closer to the biscuit style in terms of structure.
What Goes Into a Cake Cobbler Topping
The ingredients list looks similar to the biscuit topping but the ratios and technique are different. You’ll still use plain flour, sugar, baking powder, and salt, but the butter is melted rather than kept cold, and there’s more liquid — giving you a pourable batter rather than a workable dough. Vanilla extract is worth including here more than in the other styles, since the topping is flavour-neutral and benefits from that extra warmth. A good-quality vanilla makes a noticeable difference when the topping is this simple.
Because the batter is looser and more liquid, this topping needs a slightly lower oven temperature and a longer bake time than the biscuit style — around 180°C / 350°F for 40–45 minutes. This gives the batter time to set through without over-browning on top.
Flavour Variations Worth Trying
The cake topping is the most versatile when it comes to flavour additions, because a smooth batter incorporates mix-ins more evenly than a crumbly dough. Add the zest of a lemon or orange for a brighter, citrusy topping that pairs beautifully with blueberry or cherry filling. Replace half the vanilla with almond extract for a subtle nuttiness that complements stone fruits particularly well. Using single cream instead of milk gives a richer, slightly denser topping with more body.
When to Use a Cake Topping
This style is the best choice for beginner bakers, or for anyone who wants a reliable, fuss-free topping. It’s also a good pick when you’re serving guests who might not be used to the rusticity of a dropped biscuit topping — the uniform, cake-like appearance feels a little more polished. It works best with moderately juicy fruits; very wet fillings can make the batter a little gummy at the base.
Crumb Topping: Buttery and Crisp
The crumb topping — sometimes called a streusel topping — is the most textural of the three. It’s a dry mixture of flour, sugar, and cold butter rubbed together until it forms clumps, then scattered over the fruit filling before baking. The result is a golden, sandy, buttery crust that stays crisp even as the fruit beneath it softens and bubbles.
If you’ve made a blueberry crisp or a black cherry crisp, this technique will feel familiar. The main difference between a crumble and a crumb-topped cobbler is typically the fruit-to-topping ratio and how the dish is presented — cobblers tend to lean toward more fruit, with the topping playing a supporting rather than starring role. The distinction is deliciously subtle, and if you’re curious about where exactly the line falls, the cobbler vs crisp vs crumble guide breaks it all down.
The Key to Getting It Right
The crumb topping should be clumpy, not powdery. You want a mix of fine sandy bits and larger clusters, because the clusters create those satisfying crisp patches on top while the smaller pieces fill the gaps and toast evenly. The trick is to stop mixing as soon as the butter is worked in and the mixture starts to clump — if you keep going, the whole thing turns into a paste.
Cold butter is essential, exactly as with the biscuit topping. Work quickly with your fingertips to keep the mixture from warming up. Some bakers add a handful of rolled oats for extra texture and a nuttier flavour, which gives the topping a heartier feel that works especially well with autumnal fruits like pear or apple. Chopped pecans or walnuts are another excellent addition — they add crunch and a slightly toasted flavour that pairs beautifully with most fruit fillings.
What Goes Into a Crumb Cobbler Topping
The basic crumb topping uses plain flour, a combination of brown and white sugar, salt, and cold butter. Brown sugar is what distinguishes a good crumb topping from a great one — it adds a subtle caramel depth that white sugar alone doesn’t give, and it helps the topping develop a deeper, richer colour as it bakes. A little cinnamon is optional but almost always an improvement, adding warmth without overpowering the fruit.
The proportions matter here more than in the other two styles. Too much butter and the topping becomes greasy and dense; too little and it stays dry and powdery without forming those satisfying clumps. As a general rule, you want roughly equal parts flour and sugar to roughly half that amount of butter by weight.
Flavour Variations Worth Trying
The crumb topping is the most adaptable in terms of mix-ins. Stir in 50g of rolled oats for a heartier crumble-style texture — especially good over the pear and blackberry cobbler. Add roughly chopped pecans or walnuts for extra crunch. A handful of desiccated coconut works beautifully with tropical fruit fillings like mango or pineapple. A pinch of freshly grated nutmeg alongside the cinnamon adds extra depth, particularly with apple or pear.
When to Use a Crumb Topping
Reach for this style when you want maximum texture and crunch, or when you’re already a fan of crisps and crumbles and want that familiar buttery, sandy finish. It’s also the best choice if you’re baking ahead — the crumb topping holds its crisp texture longer than the other two styles, making it a practical option if the cobbler needs to sit for a few hours before serving. It suits almost any fruit, but works particularly well with firmer varieties like apple, pear, and plum that benefit from the longer bake time.
How to Choose the Right Cobbler Topping
With three solid options to choose from, how do you decide? In most cases, it comes down to three things: the texture you want, the fruit you’re using, and how much time and effort you want to put in.
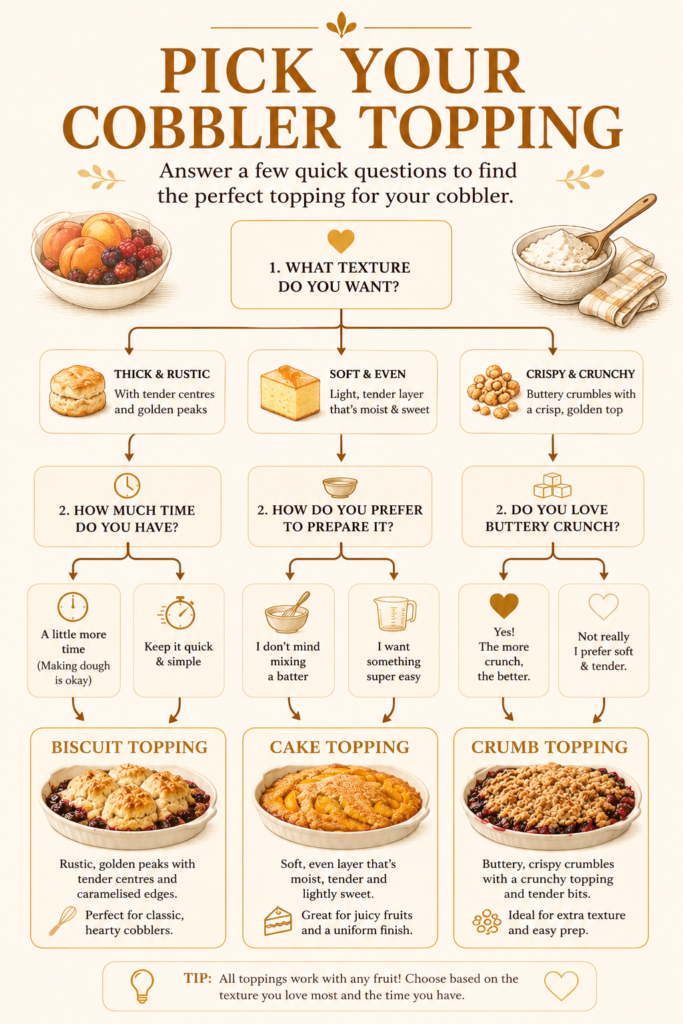
Go with a biscuit topping when you want something that looks and feels classically homemade. It’s the most traditional style, the most satisfying to eat, and the one that holds up best to very juicy fillings. It does require a little technique — keeping the butter cold and avoiding overmixing — but it’s not difficult once you understand why those steps matter.
Choose a cake topping when you want something lighter, softer, and quick to put together. It’s the most beginner-friendly option and the most forgiving if you’re not confident with your technique yet. It gives a more uniform, less rustic result, which can feel more polished for certain occasions.
Reach for a crumb topping when texture is your priority. It delivers the crunchiest, crispiest result of the three, and it’s also the most flexible when it comes to adding nuts, oats, or spices. If you’re baking for a crowd or making the cobbler ahead of time, this is often the most practical choice.
All three styles work with almost any fruit. That said, juicier fruits like peaches, berries, and plums tend to work well under all three toppings, while firmer fruits like apples and pears benefit from the slightly longer bake times that the biscuit and crumb styles accommodate well.
Oven Temperature and Timing
Getting the oven temperature right makes a significant difference to how the topping turns out. As a general guide:
- Biscuit topping bakes best at a slightly higher temperature — around 190°C / 375°F — because the dough needs strong heat to puff up quickly and develop colour before the fruit overcooks. Bake for 30–35 minutes.
- Cake topping needs a lower, steadier heat — around 180°C / 350°F — to allow the batter to set through evenly without burning on top. Allow 40–45 minutes.
- Crumb topping is happy at 190°C / 375°F. The shorter bake time (35–40 minutes) is usually enough for the topping to toast and the fruit to bubble.
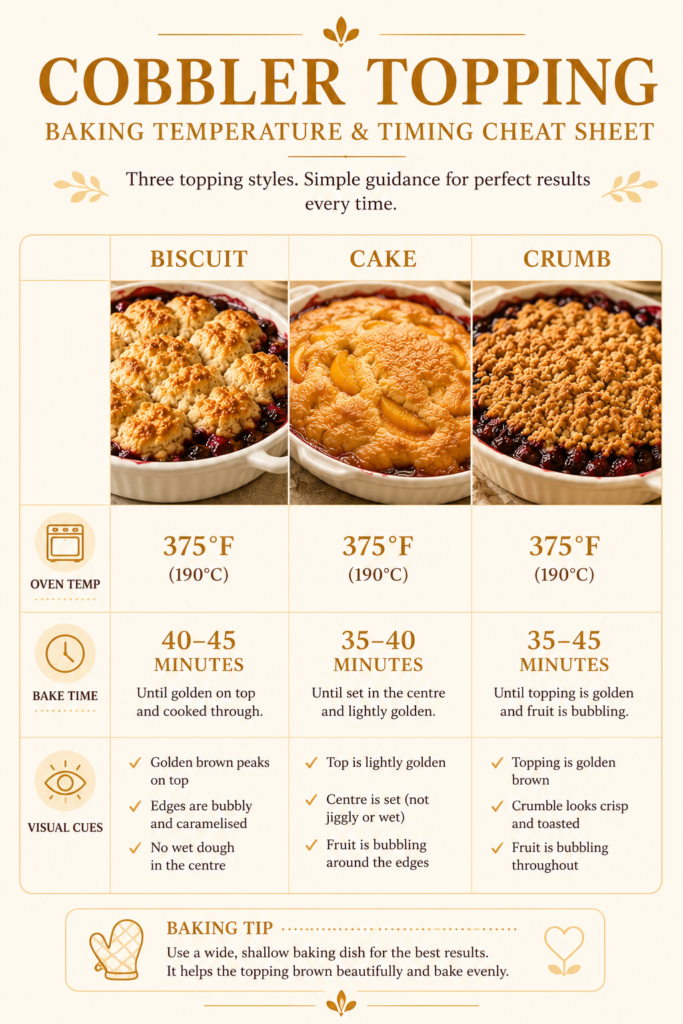
In all cases, the cobbler is done when the topping is deep golden and the fruit is visibly bubbling at the edges. If the top is browning before the fruit has cooked through, cover the dish loosely with foil and give it more time. If you’re unsure whether your oven is running hot or cool, it’s worth understanding baking temperatures in a little more detail.
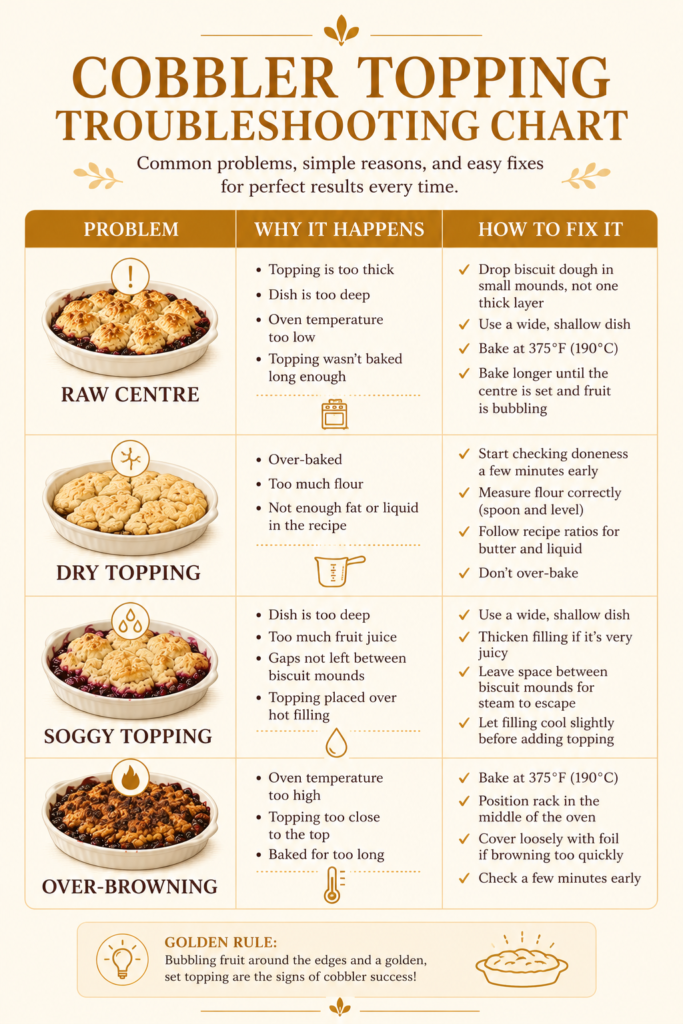
Troubleshooting Common Cobbler Topping Problems
The topping is raw or gummy in the middle. This usually happens in a dish that’s too deep, or when the topping has been spread too thickly. Use a wide, shallow baking dish and make sure you’re not overloading it. For biscuit and crumb toppings, leave gaps to allow steam to escape.
The topping is too dry or crumbly. With a biscuit topping, this means either not enough liquid or the dough was worked too long after the liquid was added, causing the gluten to tighten. With a crumb topping, it usually means not enough butter, or the butter was added too warm and didn’t coat the flour properly.
The topping sank into the filling. This is most common with the cake batter style if the fruit filling is very wet. Thickening the fruit filling slightly with a little cornflour before adding the topping helps prevent this. Alternatively, try the pour-under method where the batter goes in first.
The top is burning before the cobbler is done. Cover loosely with foil about two-thirds of the way through baking and continue until the fruit is bubbling. This is more common in fan ovens, where the circulating heat can over-brown the surface faster than the interior cooks.
Serving and Storage
Cobbler is at its very best served warm, roughly 10–15 minutes after it comes out of the oven — resting lets the fruit juices thicken slightly so it serves more neatly. A scoop of vanilla ice cream is the classic accompaniment, with the cold cream melting into the warm fruit in a way that feels completely perfect. Softly whipped cream or crème fraîche also works beautifully. For an extra-indulgent option, a drizzle of salted caramel over the top of a biscuit or crumb cobbler is hard to argue with.
Leftovers keep well covered in the fridge for up to three days. Reheat in the oven at 160°C / 325°F, covered loosely with foil, for 15–20 minutes. The microwave works in a pinch but softens the topping significantly — a toaster oven is a much better option for individual portions if you want to preserve any of the original texture.
Cobbler Topping FAQs
Can I prepare the topping in advance? Yes, for both the biscuit and crumb styles. The biscuit dough can be made, portioned into mounds, and refrigerated on a tray for up to 24 hours before baking. The crumb mixture can be made up to 48 hours ahead and kept in an airtight container in the fridge. The cake batter is best made fresh — once the liquid hits the baking powder, the leavening starts to activate, so it won’t perform as well if left to sit.
Why is my cobbler topping still raw in the middle? Almost always a dish depth issue, or the topping is too thick. A wide, shallow dish is key. For biscuit-style toppings, make sure you’re dropping the dough rather than spreading it — gaps are intentional and help steam escape. If the top browns before the middle cooks through, cover with foil and continue baking.
Can I use self-raising flour instead of plain flour? You can, but you’ll need to reduce or omit the baking powder. Self-raising flour already contains a leavening agent, and too much can cause the topping to rise aggressively and then collapse. As a rough guide, if a recipe calls for 1 teaspoon of baking powder per 150g of plain flour, omit the baking powder entirely when using self-raising. For more detail on how leavening agents work, the baking powder vs baking soda guide explains it clearly.
What’s the difference between a cobbler topping and a crumble topping? They’re very similar, but the proportions and context differ slightly. A crumble (or crisp) is typically a dish where the topping and fruit are roughly equal in importance, and the topping often includes oats. Cobbler is more fruit-forward, with the topping playing more of a supporting role. The texture of the topping itself can be nearly identical. For a full breakdown of the differences between these desserts, the cobbler vs crisp vs crumble guide covers everything in detail.
Can I freeze a cobbler? Freezing an assembled cobbler isn’t ideal — the topping tends to go soggy when thawed. A better approach is to freeze the fruit filling separately, then make a fresh topping when you’re ready to bake. The fruit filling freezes well for up to three months.
Keep Baking
- Homemade Peach Cobbler with Whipped Cream — the classic combination to put your new topping skills to work
- Pear and Blackberry Cobbler — a beautiful autumn bake that suits all three topping styles
- Cobbler, Crisp, or Crumble? Here’s the Difference — if you’re still not sure where cobbler ends and crumble begins, this clears it up
- Rustic Blueberry Crisp with Maple Syrup — a related technique that’s worth having in your repertoire
- Fresh vs Frozen vs Canned Peaches for Baking — everything you need to know before you choose your fruit
Which cobbler topping style do you always come back to? Drop a comment below — I’d love to know if you’re a biscuit traditionalist or a crumb topping convert.
If you found this guide useful, sign up for the Peacock Baking newsletter for more technique guides, seasonal recipes, and baking tips delivered straight to your inbox.