As an Amazon Associate I earn from qualifying purchases and sometimes recommend products from other sellers at no extra cost to you. For more details see my disclosure policy and privacy policy.
Coconut flour has a reputation for wrecking a recipe, and it usually earns that reputation the same way: someone swaps it in for regular flour at a 1:1 ratio and ends up with something dry, crumbly, and barely holding together. That failure is not bad luck. It is coconut flour behaving exactly the way it always behaves, just without anyone warning you first.
This guide skips the general flour-types overview (we already cover that ground in The Complete Guide to Baking Flours) and goes straight to the part that actually matters here: the conversion rules, the ratios, and the method that keeps coconut flour from turning your bake into a science experiment gone wrong.
🥥 Why Coconut Flour Behaves So Differently
Coconut flour is made from dried, ground coconut meat after most of the oil has been pressed out for coconut oil production. What is left is extremely high in fibre and extremely absorbent, soaking up many times its own weight in liquid.
It also contains no gluten, so it cannot form the stretchy protein network that gives wheat-based batters and doughs their structure. Between the fibre content and the total lack of gluten, coconut flour needs a completely different approach rather than a simple swap.
This is also why coconut flour is a popular choice for gluten-free and lower-carb baking specifically: it is naturally gluten-free and lower in digestible carbohydrates than wheat flour, purely as a matter of what it is made from and how it is processed. That is simply a fact about the ingredient rather than a claim about any particular diet, so treat it as useful background rather than a reason to swap it into every recipe you own.
Flavour-wise, coconut flour brings a mild, slightly sweet coconut note rather than the neutral backdrop wheat flour provides. It is subtle enough that vanilla, cinnamon, and chocolate all pair with it easily, but it is there, so it is worth keeping in mind if you are baking for someone who actively dislikes coconut (that’s me!).
📐 The Core Conversion Rule
Here is the rule that matters most: use roughly one quarter to one third the amount of coconut flour that a recipe calls for in regular flour, and add one extra egg for every quarter cup of coconut flour used.
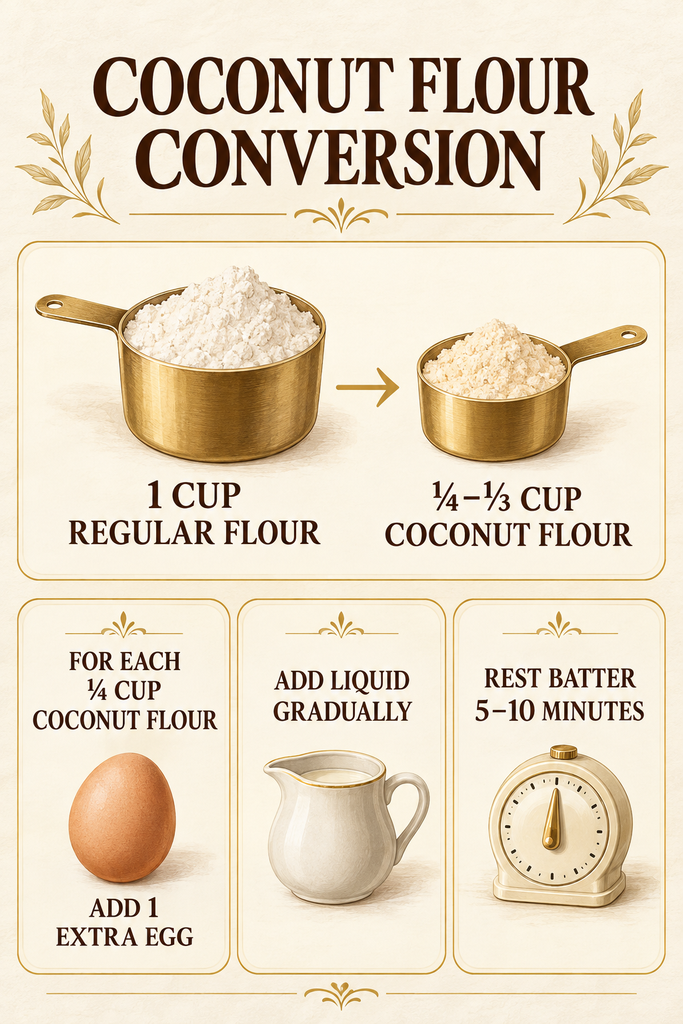
Worked example: a recipe calling for 1 cup of all-purpose flour becomes roughly ¼ to ⅓ cup of coconut flour, plus 4 extra eggs (one for every ¼ cup), on top of whatever eggs the original recipe already included.
That egg count often surprises people the first time they see it written out, but it is doing real structural work. Without it, you are left with a dry, dense mixture that has nothing to bind it together once the coconut flour has soaked up all the available moisture.
Alongside the extra eggs, plan on adding extra liquid too, whether that is milk, water, or a dairy-free alternative. There is no single fixed ratio for this part, since it depends on how thick your other wet ingredients already are, so add it gradually and watch the batter rather than following a number blindly.
Where this ratio comes from: this is not a figure we invented. It is the same conversion rule cookbook author Adriana Harlan sets out in Paleo Desserts For Dummies, and it lines up with what most other tested coconut flour recipes use too. No coconut flour brand prints an official ratio on the bag, so treat this as the trusted baking convention it is, a solid starting point rather than an exact science, since absorbency still varies a little from brand to brand.
🥞 A Second Worked Example: Converting a Pancake Batter
Ratios make more sense once you have seen them applied twice, so here is a second example using a typical pancake recipe that calls for 1½ cups of all-purpose flour.
At one quarter to one third the amount, that becomes roughly ⅓ to ½ cup of coconut flour. Following the one-extra-egg-per-¼-cup rule, that means adding around 6 extra eggs on top of whatever the original recipe already calls for, plus extra milk or another liquid, added gradually, until the batter loosens back up to a proper pourable pancake consistency.
It looks like a lot of eggs on paper, and it is, but pancake batter is exactly the kind of loose, wet mixture where that egg count is easiest to judge by eye. If the batter still seems too thick to pour after resting, add liquid a tablespoon at a time rather than all at once, since coconut flour batters can go from too thick to too thin faster than a wheat-based one.
🧱 Binders and Structure: Why Eggs Alone Aren’t Always Enough
Eggs are the main structural workhorse in most coconut flour bakes, which is exactly why coconut flour rarely works in egg-free recipes without a serious rework. But in bread-style bakes specifically, where you want a chewier, more elastic crumb rather than a cakey one, eggs alone often are not enough.
That is where psyllium husk or ground flaxseed (mixed with water to form a gel) come in. Both act as additional binders that mimic some of gluten’s stretch and water-holding ability, which is part of why coconut flour is almost never used as the sole flour in yeasted breads or anything meant to rise and hold a chewy structure. It works far better in bakes that are meant to be dense and moist by design: muffins, pancakes, and quick breads, where a tender, cakey crumb is the goal rather than a flaw.
If a recipe calls for a fully bread-like texture and only lists coconut flour and eggs, treat that as a sign the recipe needs a second look before you commit a full batch of ingredients to it.
⏳ Let Your Batter Rest
Coconut flour batter is not fully done absorbing liquid the moment you finish mixing it. Give it 5 to 10 minutes to sit before you bake, and you will often see it thicken noticeably right in front of you.
This resting step matters for two reasons. First, it tells you the truth about your batter’s actual consistency, since a batter that looks too thin straight after mixing can look completely correct ten minutes later. Second, it gives you a chance to adjust before baking rather than after, when it is too late to fix. If the batter is still noticeably loose after resting, add a small amount of extra coconut flour, a tablespoon at a time. If it has gone stiff and paste-like, loosen it with a splash more liquid.
🧁 Beginner-Friendly Bakes to Start With
Start with recipes that are naturally forgiving of a dense, moist crumb, since that plays to coconut flour’s actual strengths rather than fighting against them.
- Muffins are close to the ideal starting point: individually portioned, quick to bake, and tolerant of a slightly different texture from what you might expect.
- Pancakes work well because the batter is loose to begin with, so coconut flour’s thickening effect is easy to judge and correct on the stovetop.
- Cookies can work nicely too, particularly drop cookies rather than anything that needs to be rolled thin, since coconut flour dough tends to be soft and a little delicate to handle. If you want a fully worked-out recipe rather than a starting point to adapt, our coconut flour chocolate chip cookies walks through a complete version with exact measurements.
- Quick breads, like a simple banana or courgette bread, tend to forgive coconut flour’s density reasonably well, since a dense, moist crumb is already part of what you are going for.
Hold off on yeasted breads, anything meant to rise significantly, or delicate laminated pastry until you have a few of the bakes above under your belt. Those are the recipes where coconut flour’s lack of gluten shows up as an actual structural problem rather than just a different texture.
🔍 Troubleshooting Common Problems
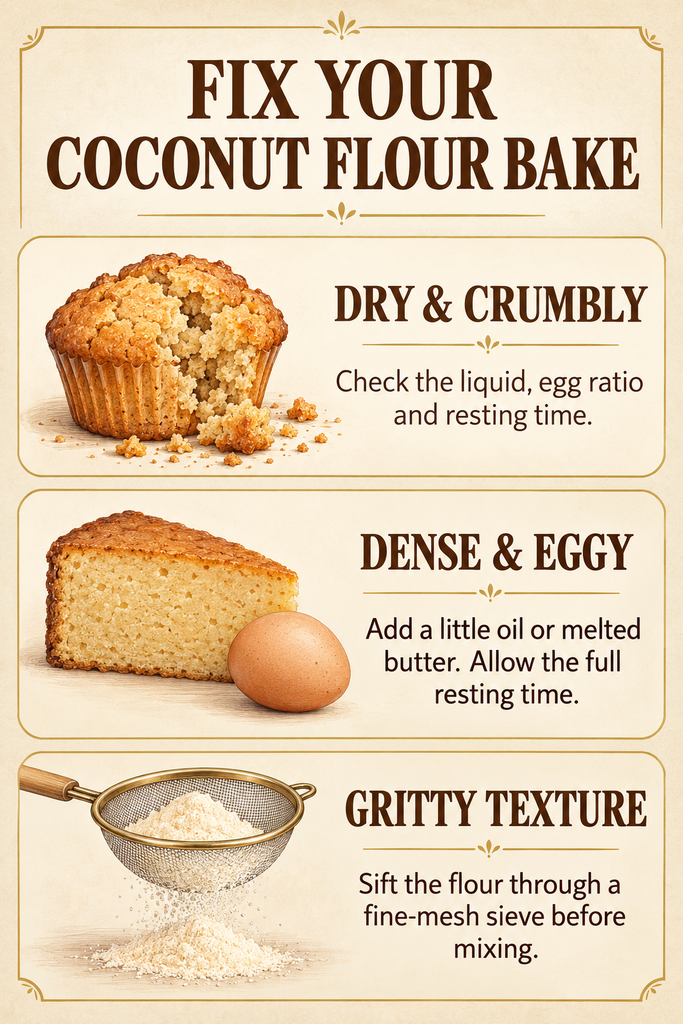
Dry and crumbly: almost always too little liquid, too few eggs, or not enough resting time before baking. Check your ratios against the conversion rule above before assuming the recipe itself is at fault.
Dense and eggy: this usually means the eggs are doing all the work with nothing else supporting them. A small amount of oil or melted butter, plus giving the batter its full resting time, both help soften an overly eggy result.
Gritty texture: sift your coconut flour before you start, since it can clump more than wheat flour and those small clumps read as grit in the finished bake. A fine-mesh sieve works better here than a standard flour sifter.
If your first attempt does not turn out quite right, that is a normal part of learning how a specific brand of coconut flour behaves, since absorbency can vary noticeably between brands. Keep your ratios and resting time consistent and adjust in small increments rather than starting over from a completely different recipe each time.
❓ Quick Answers to Common Questions
Can I mix coconut flour with other flours? Yes, and it is often a good compromise for a beginner. Blending a small amount of coconut flour into a recipe that is mostly almond flour or wheat flour lets you take advantage of coconut flour’s structure and fibre without having to rework the entire ratio from scratch.
Why did my coconut flour bake turn out fine on one try and dry the next? Different brands and even different batches can vary in exactly how absorbent they are. If a recipe that worked before suddenly turns out dry, add a touch more liquid next time and treat the ratios above as a starting point rather than a fixed law.
Can I use coconut flour in savoury cooking, not just baking? It can work as a light coating for pan-frying or as a thickener in small amounts, but its sweetness and coconut flavour make it a better fit for sweet bakes than savoury sauces or gravies.
🛒 Buying and Storing Coconut Flour
Look for coconut flour with no added sugar and nothing beyond dried, defatted coconut on the ingredients list. Weighing your ingredients on a digital kitchen scale rather than measuring by cup makes a real difference with a flour this absorbent, since a tightly packed cup and a loosely spooned cup of coconut flour can differ enough to throw off your ratios. Our guide to measuring baking ingredients properly covers the spoon-and-level method if you would rather not weigh everything.
Store coconut flour in an airtight container in a cool, dry place, and it will keep for several months. Because of its higher fat content compared to wheat flour, it can turn rancid faster in a warm kitchen, so refrigerating it is worth considering if you bake with it only occasionally and want it to last.
🔁 If You’re Missing an Ingredient Mid-Recipe
Coconut flour recipes tend to be less forgiving of last-minute ingredient swaps than wheat-based ones, simply because the ratios are so specific to begin with. If you find yourself missing an egg or a particular liquid partway through a bake, our general baking substitutions guide covers safe swaps for common ingredients, though treat any substitution in a coconut flour recipe as something to test in a small batch first rather than trusting it in a full batch straight away.