As an Amazon Associate I earn from qualifying purchases and sometimes recommend products from other sellers at no extra cost to you. For more details see my disclosure policy and privacy policy.
If you’ve ever bitten into a homemade chocolate-dipped strawberry and had the coating turn soft and streaky in your hand, you’ve met the problem tempering solves. That dull, soft chocolate isn’t ruined, but it’s missing the glossy shine and satisfying snap you get from a chocolate shop. Once you know how to temper chocolate at home, you can get that same professional finish with nothing more than a thermometer, a bowl, and a little patience.
This guide picks up where our post on how to melt chocolate at home leaves off. If you can already melt chocolate without seizing it, you’re ready for the next step. We’ll walk through what tempering actually does to chocolate, the exact temperatures to hit for dark, milk, and white chocolate, and three beginner-friendly methods so you can pick the one that fits your kitchen.
What Is Tempering (And Why Does It Matter)?
Chocolate is full of cocoa butter, and cocoa butter can set into several different crystal structures depending on how it’s heated and cooled. Only one of those structures, called Form V, gives you the glossy look, firm snap, and slow melt that make good chocolate feel like good chocolate. Tempering is simply the process of heating and cooling chocolate in a specific sequence so it sets into that stable crystal form instead of a random mix of unstable ones.
Skip tempering and your chocolate will still taste fine, but it will set soft, dull, and prone to melting the moment you pick it up. Left long enough, it can also develop a chalky white or grey film called bloom, which happens when unstable cocoa butter crystals rise to the surface. Bloomed chocolate is completely safe to eat and works fine in baking, but it won’t give you the crisp shell you want on a dipped biscuit or a batch of homemade bark.
When You Actually Need to Temper
You don’t need tempered chocolate for melting into a cake batter, stirring into ganache, or drizzling over brownies. Tempering matters when the chocolate needs to set on its own and look good doing it: chocolate bark, dipped strawberries, moulded shapes, decorations, and coated biscuits or pretzels are the classic uses. If your chocolate covered strawberries have ever looked a bit sad the next day, tempering is very likely the missing step.
Choosing the Right Chocolate for Tempering
Not all chocolate behaves the same way under heat, and this is where a lot of beginners get tripped up. Standard chocolate chips are formulated to hold their shape when baked into cookies, which means manufacturers often add stabilisers that make them resistant to melting smoothly and reluctant to temper properly.
For tempering, you want real chocolate: a bar, or ideally couverture, that lists cocoa butter as one of the first ingredients rather than vegetable oils or other fats. Couverture chocolate has a higher percentage of cocoa butter, which makes it more fluid when melted and far more cooperative when you’re trying to coax it into temper. It costs a bit more than a bag of supermarket chips, but for dipping and decorating work, the difference in shine and snap is worth it.
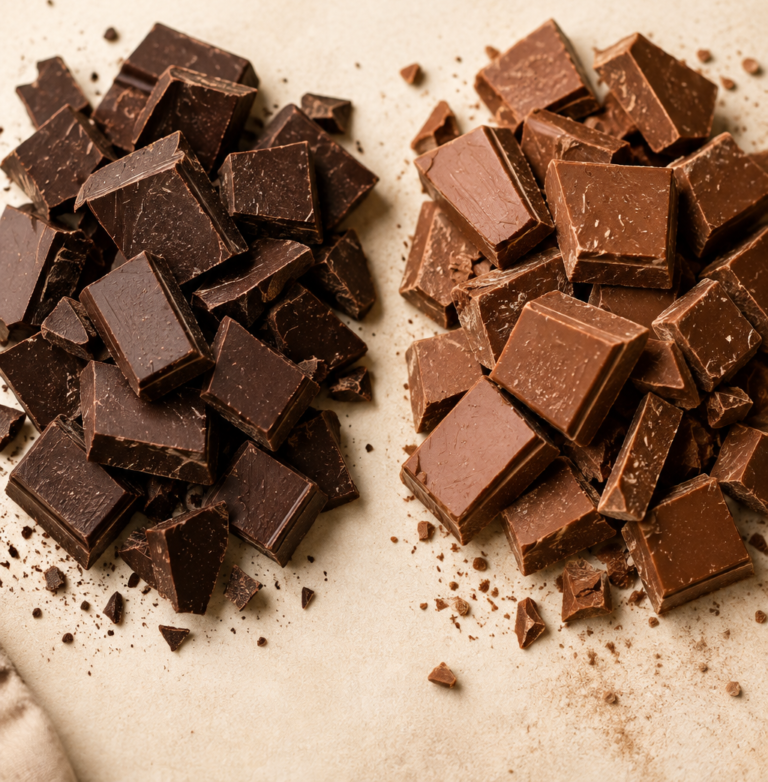
If you’re working with different types of chocolate, keep in mind that dark, milk, and white each behave slightly differently because of their fat and milk solid content. White and milk chocolate are more heat-sensitive than dark and will scorch at lower temperatures, so they need a gentler touch throughout the whole process.
The Temperature Chart for Dark, Milk, and White Chocolate
This is the part worth bookmarking or printing out, because tempering really does come down to hitting the right numbers at the right stages. Every type of chocolate goes through the same three stages: melting, cooling, and reheating to a working temperature.
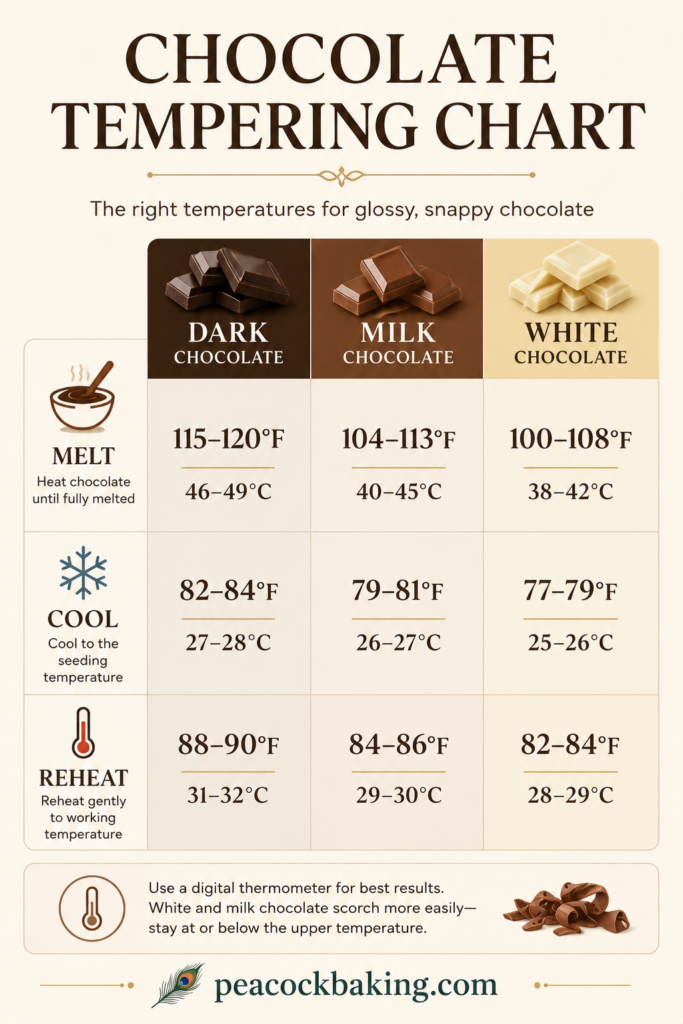
Dark chocolate:
- Melt to 115–120°F (46–49°C)
- Cool to 82–84°F (27–28°C)
- Reheat to 88–90°F (31–32°C) to work
Milk chocolate:
- Melt to 104–113°F (40–45°C)
- Cool to 79–81°F (26–27°C)
- Reheat to 84–86°F (29–30°C) to work
White chocolate:
- Melt to 100–108°F (38–42°C)
- Cool to 77–79°F (25–26°C)
- Reheat to 82–84°F (28–29°C) to work
Notice that white and milk chocolate top out lower than dark. That’s because their milk solids scorch more easily, so treat those upper numbers as a hard ceiling rather than a target to push toward. A digital instant-read thermometer takes the guesswork out of all of this and is worth having on hand for any of the methods below.
What You’ll Need
Before you start, gather a few basics. None of this requires specialist equipment, though a couple of tools make the process noticeably easier.
- A digital thermometer, ideally one that reads quickly and accurately at low temperatures
- A heatproof bowl for melting, or a double boiler if you’re going the stovetop route
- A silicone spatula for stirring
- A sharp knife or a strip of baking parchment for testing your temper
- Your chocolate of choice, finely chopped so it melts evenly
If you’re planning to use the microwave method, a sturdy microwave-safe bowl makes a real difference, since flimsy plastic bowls can warp or heat unevenly.
Three Methods to Temper Chocolate at Home
There isn’t one correct way to temper chocolate, and which method suits you depends on your equipment and how confident you feel with a thermometer. All three rely on the same principle: introducing already-tempered “seed” chocolate, or carefully controlling the cooling, so the cocoa butter crystallises correctly.
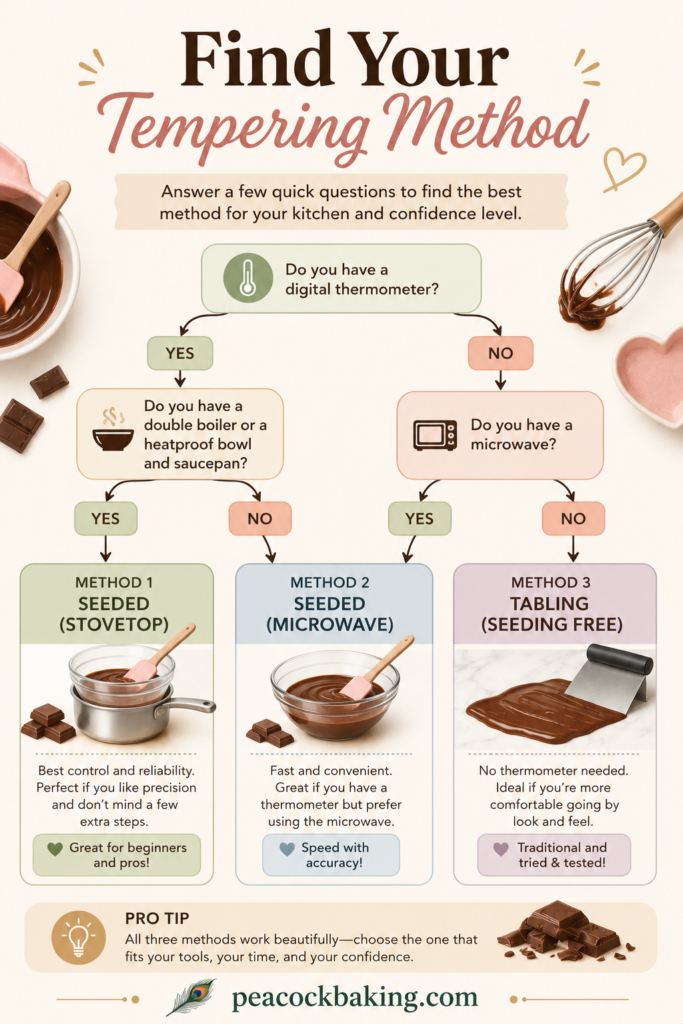
Method 1: Seeding on the Stovetop (Bain-Marie)
This is the classic approach and a good place to start if you want to really understand what’s happening at each stage.
- Chop your chocolate finely and set aside about a quarter to a third of it to use as your seed.
- Melt the larger portion gently over a bain-marie, using 1 to 3 inches of barely simmering water in a pan with a bowl resting on top, making sure the bowl never touches the water.
- Heat the chocolate to the melting temperature listed for your chocolate type above, stirring frequently.
- Remove the bowl from the heat and add the reserved chopped chocolate a little at a time, stirring until each addition melts before adding more.
- Keep adding and stirring until the chocolate reaches the cooling temperature for your chocolate type.
- Return the bowl briefly to the warm water, stirring constantly, until the chocolate climbs to its working temperature.
- Test before using, following the knife test below.
Method 2: Microwave Seeding Method
This gives you the same seeding principle as the stovetop method, just with less equipment and a bit more speed.
- Chop your chocolate finely and separate out a quarter to a third to use as seed, just as above.
- Microwave the larger portion at 50% power in 20 to 30 second bursts, stirring between each, until it reaches the melting temperature for your chocolate type.
- Remove from the microwave and add the reserved chopped chocolate gradually, stirring until it’s fully melted and the mixture cools to the target temperature.
- If the chocolate needs a small boost to reach its working temperature, give it a very short burst of 5 to 10 seconds and stir well.
- Test before using.
Method 3: Microwave-Only Method (No Thermometer Needed)
If you don’t own a thermometer, this method leans on timing and touch instead, and it’s the one many home bakers reach for once they’ve built up some confidence.
- Chop all of your chocolate into small, even pieces no larger than about 7mm, since uneven pieces melt unevenly and can throw off the whole process.
- Microwave in 30-second bursts, stirring thoroughly between each.
- Once the chocolate is mostly melted with some small lumps remaining, switch to 20-second bursts, then 10-second bursts, stirring each time.
- Stop microwaving while a few small unmelted pieces remain and let the residual heat and stirring finish the job off the heat. This last stretch happening outside the microwave is what keeps the chocolate in temper.
- Check the temperature against your lip if you have no thermometer: tempered chocolate for dipping should feel roughly the same temperature as your lip, or slightly cooler. If it feels warm, it’s likely too hot to be in temper.
How to Know If Your Chocolate Is Tempered
Before you commit a whole batch to dipping or moulding, it’s worth running a quick test, because tempered chocolate can look identical to untempered chocolate while it’s still liquid.
Dip the tip of a knife or a strip of baking parchment into the chocolate and set it aside at room temperature for two to three minutes. Chocolate in good temper will set firm and glossy within that window, with no streaks or dull patches. If it stays soft, looks streaky, or takes much longer to set, the chocolate isn’t in temper yet and needs another round of seeding or cooling before you continue.
Common Tempering Mistakes (And How to Fix Them)
Almost every tempering failure traces back to one of a handful of causes, so troubleshooting is usually more straightforward than it feels in the moment.
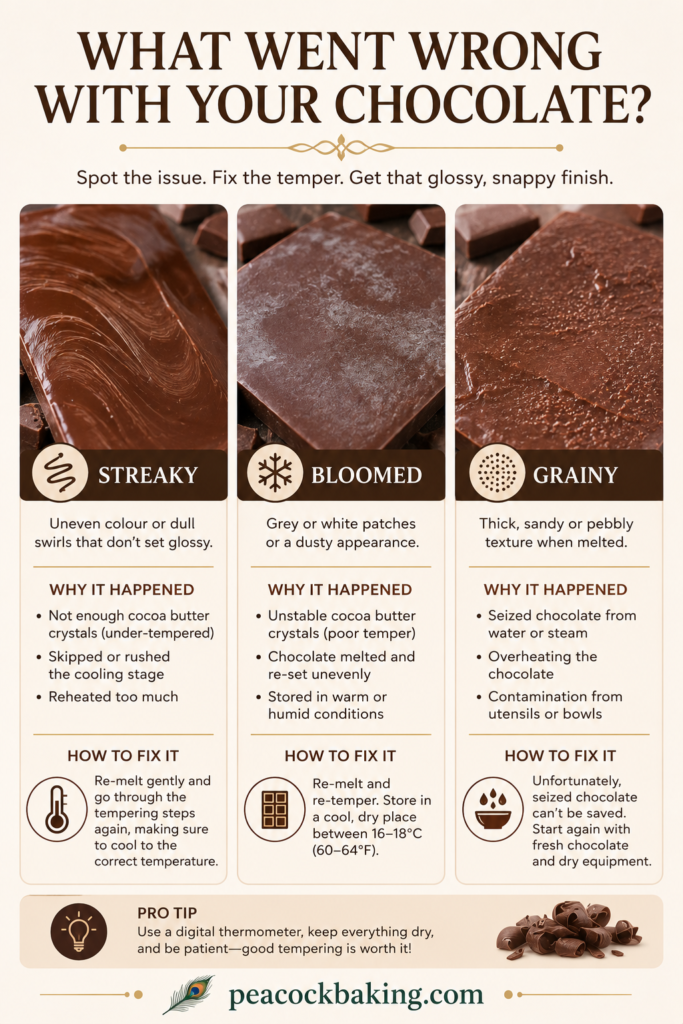
- A drop of water or steam got in. Even a small amount of moisture will cause chocolate to seize into a thick, grainy paste. Keep every bowl, spatula, and thermometer completely dry, and make sure your bain-marie water never splashes up into the bowl.
- The chocolate overheated. Going above roughly 120°F (49°C) for dark, 113°F (45°C) for milk, or 108°F (42°C) for white can scorch the chocolate and destabilise the cocoa butter beyond saving. Once chocolate is burnt, it can’t be brought back, so it’s worth erring on the side of gentle heat and patience.
- You used chocolate chips instead of couverture or a proper bar. As mentioned earlier, the stabilisers in many chips resist smooth melting and clean tempering.
- The kitchen was too warm. Tempered chocolate is sensitive to its environment, and a hot kitchen can pull it out of temper while you’re still working with it. If this happens often, try working near an open window or during a cooler part of the day.
If your chocolate seizes completely, it’s not wasted. Seized chocolate can be rescued by stirring in a small amount of warm cream or oil to smooth it back out for use in ganache, sauces, or brownie batter, even though it won’t be salvageable for dipping or moulding at that point.
Putting Tempered Chocolate to Work
Once you’ve got a batch of glossy, properly tempered chocolate, it’s worth having a project ready to go, since tempered chocolate only stays workable for so long before it needs a gentle reheat. Dipped strawberries and biscuits are the easiest place to start, and our chocolate covered strawberries post is a good next stop if you want to put your new skills straight to use. Tempered chocolate is also what gives truffles like our chocolate hazelnut truffles their firm outer shell rather than a soft, sticky coating.
If you’re leaning more toward baked goods, a properly tempered chocolate shell is also the finishing touch behind a lot of the techniques covered in our guide to chocolate pastry, from glazed tarts to decorative shards on top of a cake.
Working in Small Batches
You don’t need a huge quantity of chocolate to temper successfully, and it’s often easier to practise with smaller amounts while you’re still building confidence. All three methods above scale down comfortably to 100 to 200 grams, though smaller batches cool faster, so keep a closer eye on the temperature and be ready to reheat gently if you’re taking your time with dipping or decorating.
Storing Tempered Chocolate
Properly tempered chocolate is fairly forgiving to store once it’s set. Keep finished pieces in a cool, dry place, ideally somewhere between 60 and 70°F (15 and 21°C), away from direct sunlight and humidity. A pantry or cool cupboard usually works better than the fridge, since condensation forming on the surface as chocolate warms back up can cause its own kind of dull, spotty bloom.
If you do need to refrigerate dipped or decorated pieces, for something like a strawberry that needs to stay fresh, let them come back to room temperature slowly and in their container before serving, so moisture doesn’t collect directly on the chocolate surface.
Recipe FAQ
Do I need a thermometer to temper chocolate, or can I do it by feel? A thermometer makes the process far more reliable, especially while you’re learning, but the microwave-only method above is designed to work without one using timing and the lip test instead.
Can I temper chocolate chips instead of buying couverture? You can try, but most chocolate chips contain stabilisers that resist smooth melting and proper tempering. For best results, choose a bar or couverture chocolate that lists cocoa butter near the top of the ingredients.
Why did my chocolate turn out streaky or dull instead of shiny? This almost always means the chocolate either never reached temper in the first place or lost it during cooling, often from overheating or an unstable kitchen temperature. Running the knife test partway through the process helps catch this before you commit a full batch.
My chocolate seized into a thick, grainy paste. What happened, and can I save it? Seizing usually comes down to a small amount of water or steam getting into the chocolate. It’s no longer suitable for dipping or moulding, but stirring in a little warm cream turns it into a smooth base for ganache, sauces, or brownies.
How long does tempered chocolate stay workable once it’s ready? As long as you keep it within its working temperature range, it should stay usable for a good stretch of dipping or decorating. Once it cools too far it will thicken, and if it’s reheated too aggressively it can fall out of temper and need another round of seeding.
Is bloomed chocolate safe to eat? Yes. Bloom is a cosmetic issue caused by cocoa butter crystals shifting, not a food safety problem, and bloomed chocolate is completely fine to melt down, re-temper, or use in baking.
Tempering chocolate is one of those skills that feels fussy the first time and almost automatic by the third or fourth try. Once you’ve got a temperature chart taped inside a cupboard door and a method that suits your kitchen, that professional glossy finish becomes just another part of the baking routine rather than something reserved for chocolate shops.
Continue Your Journey
- Secrets to Perfectly Melt Chocolate at Home — the foundational skill this guide builds on
- Types of Chocolate: From Milk to Dark & Everything Between — understand what you’re working with before you temper it
- Chocolate Covered Strawberries — your first project for freshly tempered chocolate
- Why Every Baker Needs a Double Boiler — the stovetop tool behind the seeding method
- The Ultimate Guide to Chocolate Pastry — where tempered chocolate shows up in baked desserts
Have you tried tempering chocolate at home yet? Let us know in the comments which method worked best for you, and subscribe for more baking techniques delivered straight to your inbox.